

Once you place these commands for validation, you can simply see the action trigger in no time.
set Timeout Demo 2
Please note that the following demo renders the same output as the first one, but instead move down with a function with the click of the button.The function commences the timer leading to show_alert function.

Here, it is imperative to understand that timeout has only been triggered once. In simple terms, when the timeout_triggerhas been called subsequent to 2 seconds, then it’s not been called again. In order to make it called recurrently in every 2 seconds, it is suggestive to add another setTimeout() call in the end of functioning timeout_trigger.
setTimeout/ clearTimeout Demo 3
In the following example, setTimeout get back with a value storing a reference belonging to the timer. The resetting or clearing of the timer can be done with the help of clearTimeout function. Please heed attention to the provided example down below-
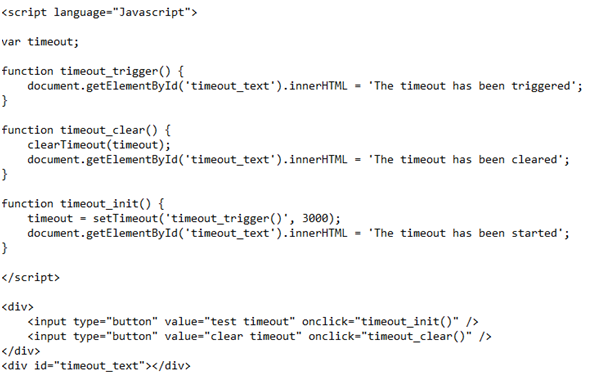
At the point where timeout_init() is applied, the concerned timeout reference is basically stored in “timeout” variable. The name that you allot to the variable is not going to make any difference, but it is crucial that it has a universalscope. That is one of the key reasons why we have put “var timeout,” affirmation at the commencement of code.
A click on “test timeout” kick-starts the timer and at the end one can clear the timeout simply by clicking “clear timeout” button.
setTimeout Application to create a countdown demo 4
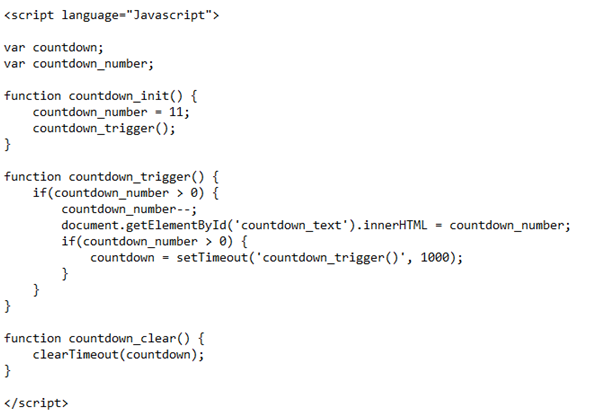
For you last but not the least, we are leaving no stone unturned as the demo unveils a countdown in which numbers count down right from 10 to 0 displaying a new update each second. The step is basically accomplished via decrementing of the counter number, then subsequently calling setTimeoutat the ultimate phase of function call timeout.
The following is the demo in the form of example code-
Conclusion
As through various demos, we tried to help you understand various insights of ReactJSsetTimeout() function. We learned how it can leads to the occurrence of the desired effect on a webpage after a set time of a trigged command like the click of a button. For instance, you wish to disable the form button once it has been clicked in order to prevent a double form submission, but re-enable the same again in the fraction of a few passing seconds. We also understood how we can cancel the callbackfrom happeningvia clearTimeout() function, in case some other action has been done indicating the fact that the timeout is not a prerequisite anymore.
The results that we can procure out of the commands mentioned above are checked for their legitimacy at the professional level. That is the reason why you can apply them whenever you come across the timeout commands the next time and fetch best results in no time.